
Introduction
When testing applications, I always want to know more about the technology used in the application stack. I strongly believe that having knowledge of the technology used ‘under the hood’ can greatly contribute to more efficient testing.
When it comes to low-code applications like Mendix, knowing what happens below the surface is at least as interesting for testers. The created applications may look different and have different functionalities, they do share common interfaces and functionalities under that hood. Knowing these interfaces and functionalities as a tester, can help in increasing the test efficiency and team collaboration.
The Client API
In October last year, I was part of a team of Anamateers during the Mendix hackathon, aka P0wn Party. Besides the great experience and challenging puzzles, it also triggered my curiosity around the Client API. This JavaScript API forms the basis for communications between frontend (browser) and backend (microflows, database objects). During the hackathon, I learned how this API could be used to create objects and trigger microflows from the browser console. This got me thinking: if triggering microflows through the console is so easy, how easy is it to incorporate this functionality into a test automation framework and use it for testing purposes?
In this article, I will not go into the exact operation of the APIs – there is a lot of information on this on the Mendix (community) websites -. Instead, I will share my learning process for incorporating Client API calls into an automation framework for the purpose of testing.
Playwright
At first, I had to decide which tool I would use for my framework. I wanted to use a tool that supported the JavaScript language, was open-source and can be used to create extensive test automation frameworks.
Based on these requirements, I chose to go for Playwright. I had never used Playwright before and my knowledge of Javascript was also limited. So, this was an opportunity for me to learn a lot of new things!
The Demo app
To check whether I was able to add the Client API calls to the framework, I first needed to create an app. Wanting to control the ability to create objects and associations and execute microflows, I created a simple app in Mendix with only these functionalities.
Creating an Object
To create an object via the Client API, a couple of things need to be considered.
- The caller needs to have write access to the object
- To be able to call the API, you need to have an active -logged in – browser session.
So to use this functionality, you must first be logged into the application with an appropriate user. With an active user session, you can trigger the mx.data.create functionality to create an object.
As a first step, I logged in as an Admin user and ran the following JavaScript snippet manually in my JavaScript console:
mx.data.create({
    entity: "MyFirstModule.Person",
    callback: function(mxObject) {
        mxObject.set("FirstName", 'test');
        mx.data.commit({
            mxobj: mxObject,
            callback: () => {}
        })
    }
})
As a result, a new person with FirstName = test was created in the app. The next step was to add the same functionality in the Playwright framework.
Integrating object creation in the automation framework
When running a Playwright test, the scripts run in its own ‘Playwright environment’ and triggers actions on a page of the target application. The Client API runs in the target application. These environments remain distinct; they operate in separate virtual machines, processes, and potentially even on different computers. So, to run a JavaScript command in the context of a target application, we need to trigger an action in Playright which executes JavaScript on the target page.
PlayWright has the function page.evaluate to do exactly that: run JavaScript in the context of the web page.
So, to be able to create a person object via Playwright, I created the following code in Playwright (note that the login steps are not included in the test; these steps are placed in the Before hook).
await page.evaluate(() => {
  mx.data.create(
  {
    entity: "MyFirstModule.Person",
    callback: function(mxObject)
    {
      mxObject.set("FirstName", '1');
      mx.data.commit(
      {
        mxobj: mxObject,
        callback: () => {}
      })
    }
  })
})
This created a person object in the database.
The next step for me, was to check if it would be possible to create a generic funcion for the creation of a database object. So, instead of defining the entity and attributes inside the evaluate function, add them as input variables.
First, I created a JavaScript Object for person (note that the naming of the keys is identical to the attribute names in the domain model):
const person = { FirstName: 'test1', LastName: 'testbas1', BirthDate: new Date('2000-01-01'), Gender: 'Male' };In the end, I added theModule name (moduleName), Entity name (objectName) and the content above as input parameter for the evaluate-function. This way, I was able to create a generic function for creating an object, where the input parameter content represents the JavaScript object as above:
await page.evaluate(({ moduleName, objectName, content }) => {
   var entityName = moduleName + "." + objectName;
   mx.data.create(
     {
         entity: entityName,
         callback: function (mxObject) {
             for (let i = 0; i < Object.keys(content).length; i++) {
                 const key = (Object.keys(content)[i]);
                 const value = (Object.values(content)[i]);
                 mxObject.set(key, value);
             }
             const guid = mx.session.sessionData.user.guid;
             mx.data.commit(
                 {
                     mxobj: mxObject, guids: [guid],
                     callback: () => { }
                 })
         }
     })
}, ({ moduleName, objectName, content }))
Since the keys in the content object are equal to the attribute names, I was able to update all values with a simple loop.
Adding an association
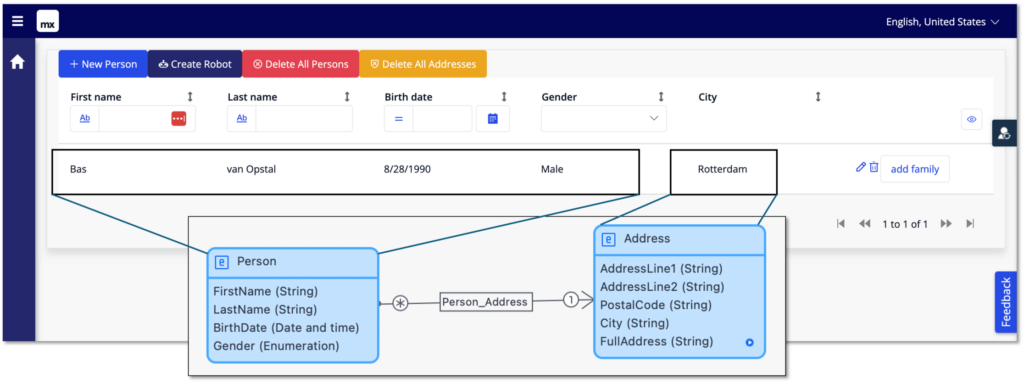
My next step was to figure out how to add an association in a generic way. As shown in the domain model above, the goal was to create an association from person to address.
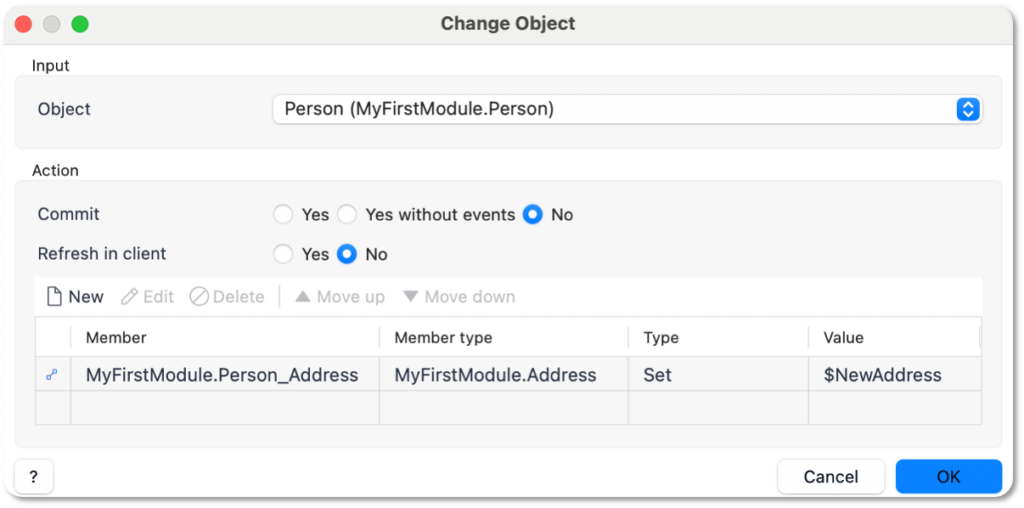
As the association points from person to address, the attribute should be stored on the person object. When the association is created via a microflow, we can see the following:
My strategy for the steps in framework was the following:
- Create Person object
- Create Address object
- Change Person object: add association
This way, I was able to re-use the previously described Create Object functionality for the first two steps and create only one new function for the association.
This association function consisted out of 3 steps itself:
- Find ID of address object
- Find Person object
- Change person object with addressID
It took me a while to figure this out, mainly because I was struggling with the asynchronous behavior of the mx.data functionalities. The only way I was able to solve it, was to add the subsequent function in the callback of the previous one. Eventually, I was able to create the following:
await page.evaluate((
{
  associationKey,
  xpathExpressionOriginalObject,
  xpathExpressionAssociatedObject
}) =>
{
  mx.data.get(
  {
    xpath: xpathExpressionOriginalObject,
    callback: function(OriginalObjects)
    {
      if (OriginalObjects.length > 0)
      {
        var OriginalObject = OriginalObjects[0];
      }
      mx.data.get(
      {
        xpath: xpathExpressionAssociatedObject,
        callback: function(associationObjects)
        {
          if (associationObjects.length > 0)
          {
            OriginalObject.set(associationKey,
               associationObjects[0]._guid);
          }
          const guid = mx.session.sessionData.user.guid;
          mx.data.commit(
          {
            mxobj: OriginalObject,
            guids: [guid],
            callback: () => { }
          })

        }
      })
    }
  })
}, (
{
  associationKey,
  xpathExpressionOriginalObject,
  xpathExpressionAssociatedObject
}))
Where the input parameters are defined as follows:
- associationKey: the Name of the association (MyFirstModule.Person_Address)
- xpathExpressionOriginalObject: the Xpath needed to retrieve the person object
- xpathExpressionAssociatedObject: the Xpath needed to retrieve the address object
These values are also determined by a function, using the same inputs as for the objects: module name, entity name and content.
Microflows
Lastly, I wanted to trigger a microflow. I created two microflows: 1 to delete all addresses and 1 to delete all persons. To keep it simple, both microflows did not have an input and an output. I just wanted to be able to see if I could create a simple function to trigger these. To trigger a microflow, the mx.data.action call is provided.
I was able to trigger the microflow through the browser console using the following command:
mx.data.action({
	params: {
		actionname: "MyFirstModule.deleteAllPersons",
		applyto: "selection",
		guids: [mx.session.sessionData.user.guid]
	},
	callback: () => {},
})
To include this in the automation framework, I simply created to input parameter for a runMicroflow function, moduleName and microflowName:
await this.page.evaluate(({ moduleName, microflowName }) =>
{
  var guid = mx.session.sessionData.user.guid;
  mx.data.action({
    params: {
      actionname: (moduleName + "." + microflowName),
      applyto: "selection",
      guids: [guid]
    },
    callback: () => {},
  })
}, { moduleName, microflowName });
Results
Now I that was able to create objects via API calls, I was wondering what the time difference between creating an object via the UI and via the API would be. So, I created two functions: object creation via the Client API and object creation via the UI. For both functions, I first log in via the UI and then I subsequently:
- Delete all address objects
- Delete all person objects
- Create Person with Address
Obviously, for the UI I used the frontend actions and for the API I used the created JavaScript API calls.
When I ran both functions – headless -, the results were as follows:

So, a time difference of 0.3 seconds for creating 1 object. Then I wondered what it would be if I created 10:


So yes, of course, the more objects you create, the greater the difference in processing time will become.
Conclusion & next steps
First of all, I learned some basics of JavaScript programming and explored some possibilities of Playwright. Still scratching the surface, but definitely worth exploring further.
When it comes to using the Mendix Client API for testing purposes, I believe that integrating these functionalities in an automation framework will contribute to a faster, more robust and more feature-focused tests. By using these API calls, it will be easier to create automated tests focused on one functionality, which will also run faster. You can set up your objects, retrieve and verify objects and even trigger microflows to check logic or create preconditions. Additionally, it can help testers with their exploratory tests. Who wants to create 100 persons with 100 different addresses manually? Why not just create it via some api calls?
There is still a lot to explore and I do have more ideas I would like to put to practice, like:
- Execute microflows with input parameters
- Assert microflow outputs
- Assert Objects
- Add error handling
- Execute nanoflows
And of course, put it into practice in a real Mendix project!
If you would like to know more about my learnings, the functionality or have any other ideas that might be worth exploring, don’t hesitate to reach out to me or my colleagues.